| I hope you have enjoyed my tips for painting snow on evergreens. If you want to print and use any of my watercolor tips for personal educational non-profit purposes please read and follow my Terms and Conditions for use. |
| Painting Heavy Snow on Evergreens |
Step 1: Sketch or draw the outline of an evergreen tree. (If you want to skip this step and draw the
shape with your brush as you paint that's ok too.)
Paint the shape of an evergreen on dry paper using a diluted mix of pale blue/blue gray/ or a clean gray
shade. What you will be painting is the beginning stages of the shadows and contours of the snow on
the evergreen tree. It's ok to leave some isolated white shapes if they "happen" as you go.
Let it dry. If this is for a greeting card start another one while you wait!
| © 2003-2010 Susie Short Studio LLC All Rights Reserved www.susieshort.net Return to Watercolor Tips |


An Option:
*** As it starts to dry and the paper starts to loose its shine
you may want to sprinkle a pinch of table salt in the sky to
create snowflakes. When using salt the timing is important if
the paper gets too dry nothing will happen. If it is too wet, the
salt will not have the right reaction to make individual
snowflakes. (You may want to experiment before trying this
on your card.) Be careful not to use too much salt.
Unless you want to create a blizzard!
After sprinkling the salt -- continue to let it dry.
As it dries You should see moisture drawn up under the salt
crystals, although the rest of the sky looks fairly dry. Carefully
and gently brush the salt off with a dry paper towel. The
moisture collected under the salt crystals may smear
so be careful and watch what you are doing.
Here's a mini lesson on painting heavy snow on evergreens that applies to painting greeting cards or a full sized winter landscape watercolor painting.
Step 3: While I was
waiting for the sky to dry,
I added a tree line at the
base of my mountain.
This is also painted with
a pale wash so that it
looks distant.
Use your imagination
when adding the back-
ground.
Each one can be
different and uniquely
your own.
waiting for the sky to dry,
I added a tree line at the
base of my mountain.
This is also painted with
a pale wash so that it
looks distant.
Use your imagination
when adding the back-
ground.
Each one can be
different and uniquely
your own.

Step 4: In this step, we will be defining the clumps of snow sitting on the branches.
Due to the weight of the snow the branches will tend to sag or hang down somewhat.
Each tree limb varies in size and shape so they will be more natural looking if they
appear irregular in both shape and position.
Due to the weight of the snow the branches will tend to sag or hang down somewhat.
Each tree limb varies in size and shape so they will be more natural looking if they
appear irregular in both shape and position.

The pattern you are aiming for is staggered much like laying bricks.
Look at the red lines I drew over this tree. Can you see how the lower
limbs are alternating between the limbs growing above them?
Look at the red lines I drew over this tree. Can you see how the lower
limbs are alternating between the limbs growing above them?
If you want to lightly sketch in the
placement of these limbs using a
pencil, these illustrations will give
you an idea of how to draw them.
Don't forget to incorporated any of
the white patches that "happened"
as you painted step one. ( I am
using a Sharpie so you can see the
marks. Please use a pencil on your
paper so you can erase the lines
later.)
Step 5: When you start painting these clumps of snow its important to blend off or soften some of
the edges. To blend or soften an edge place a stroke of clear water next to a painted stroke. The color
will bleed into the damp area. If you just make a larger puddle, you are using too much water in your
initial painted stroke...adjust by blotting your brush to eliminate some of the water.
I like to use pale shades of blue or cool grays for snow shadows. One of my favorites is a light
gray-purple color.
Once you have added some of the contour and shadows to the clumps of snow you may decide that
you like to heavy snow look and leave it as it is. (See the example in image of step 4 & 5 below)
Let the painting dry before moving to step 6.


Step 6:
Now you can add the branches and
green needles under the snow
clumps. The more green you add
the lighter the snow fall will look.
There is a wide range of
possibilities and looks that can be
created depending on how much or
how little of the greenery you include.
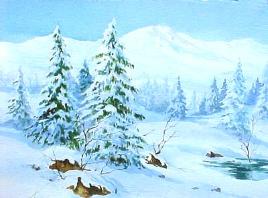
Step 7: This is an optional step.
The example (R) shows more
greenery less white snow.
Now add other interesting details to
complete the setting. Ta Dah!
Below are examples of more
evergreens in heavy snow with other
landscape elements added.
Happy Painting!
Now you can add the branches and
green needles under the snow
clumps. The more green you add
the lighter the snow fall will look.
There is a wide range of
possibilities and looks that can be
created depending on how much or
how little of the greenery you include.
Step 7: This is an optional step.
The example (R) shows more
greenery less white snow.
Now add other interesting details to
complete the setting. Ta Dah!
Below are examples of more
evergreens in heavy snow with other
landscape elements added.
Happy Painting!
| Step 1 & 2 |
| Step 4 & 5 |
| Step 6 |

| Step 7 |

Salt added
\
\

Step 2: When it's dry, add a little more blue paint to your mix and paint the sky around the top portion
of the evergreen tree shape. Your brush should be fairly juicy and the paint should spread quickly and
evenly. This is called a flat wash. You may want to paint around the top edge of a mountain too.
Now....time to let it dry again.***
of the evergreen tree shape. Your brush should be fairly juicy and the paint should spread quickly and
evenly. This is called a flat wash. You may want to paint around the top edge of a mountain too.
Now....time to let it dry again.***
| © 2003-2010 Susie Short Studio LLC All Rights Reserved |
(Hint: You will find this pattern repeated in other forms of nature
such as pine cones too!)
such as pine cones too!)
*** Permission to print for personal study. If you choose to
print this page -- set your printer to landscape mode and
check the margins for the best results.
print this page -- set your printer to landscape mode and
check the margins for the best results.